

Friday, October 30, 2015
Wednesday, October 28, 2015
a slightly spooky dinner party
If you happen to check out this space at all regularly you must have noticed I'm not around much. I am currently working on a big project that's taking up all of my time and focus and so I'm not doing as much other work, let alone jobs around the apartment so there hasn't really been much of anything to share here. It's probably going to continue to be pretty sporadic around here through January but I will pop in whenever I have something I can share. Including a party for October!
I just couldn't leave off without doing something for this month so I gave myself two hours and whatever supplies I had in the house to put this together

I started with color pallet. I wanted to go almost all white, with bits of gray and black and then some sort of color for a centerpiece. I layered some lace on top of a white tablecloth with white napkins and vintage silver flatware.


I set each place with a large smooth white rectangular plate (thank you mom!) and smaller gray textured plate, and the scull party favor and the matchbook place cards. The glasses are vintage and for a centerpiece I added a bunch of apples and small animal bones on top of the lace runner.


The cake was topped with simple bat shapes cut out of black card stock and googly eyes both glued to wooden skewers. I made another cake stand out of a plate and polka dot bowl (I'm loving the layered dish cake stand-so easy) The backdrop was made out of white and gray honeycombs and some larger paper bats.

I got the sculls at a dollar store and spray painted them white and added the tea candles, then melted wax around the edge to drip down the sides. I covered mini matchboxes with black paper and glued on more googly eyes so they looked a bit monster-ish. The names were written on vellum with ink

Like I said, this was all stuff I had on hand but if I were to price out the few things that could have been bought special it would still be super inexpensive.
Supplies
honeycombs......................................................................................$12
sculls.................................................................................................$4
googly eyes.......................................................................................$2
total...................................................................................................$16

I've always wanted to do a more grown up cocktail style Halloween party and while it wasn't in the cards time wise this year, I will be storing away these pictures for inspiration and hopefully next year I can make it happen.

Friday, October 23, 2015

Monday, October 19, 2015
Apartment Therapy
Well I can officially check something off my life to-do list. Something I did is on Apartment Therapy. This has always been a goal of mine, something I joked about but never really thought would happen until, prompted by my best friend, I submitted my finished kitchen to their before and after contest and lo and behold I was selected! It was the most incredible thing to see my kitchen on this site that I read every day and I couldn't be more jazzed about it.
If you are interested you can check out the full kitchen here and the tutorial for the painted floor here. It feels sort of like prom for houses, with the prettiest girl winning with the most votes, so if you like it and want to vote for it that's amazing but as they say during Oscar season, "It's an honor just to be nominated."

If you are interested you can check out the full kitchen here and the tutorial for the painted floor here. It feels sort of like prom for houses, with the prettiest girl winning with the most votes, so if you like it and want to vote for it that's amazing but as they say during Oscar season, "It's an honor just to be nominated."
Friday, October 16, 2015
{snapshot}
I made a pretty spectacular pumpkin curry this week in the crock pot. It hasn't really been cold enough for cozy autumn foods but I've been craving them nonetheless. This was made by putting a can of coconut milk and spices (tumeric, curry, and garam masala) in the slow cooker with cut up pumpkin, sweet potato, onion, garlic and chicken, and then cooked it for six hours before serving it over black rice. It was the perfect seasonal colors and it made my whole house smell delicious. Now I just hope I don't get sick of eating it every day...

Wednesday, October 14, 2015
busy and a wedding
Just popping in to say a quick hello and unfortunately it seems everything that I've been working on (and most of what I will be working on for the foreseable future) isn't really sharable here. So it's been real quiet round these parts. But I went to a truly spectacular wedding this weekend so I thought I might share a few photos of that in the meantime.


Friday, October 9, 2015

Monday, October 5, 2015
always one little change left to make
Just tweaking the living room bit by bit with the advent of the new couch and more space.

This last weekend I moved the Moroccan wedding blanked (diy see here) to behind the theater chairs.

I also filled the bench behind the couch with books and magazines. No need for it to be empty and also it's nice to have reading material on hand.

Lastly, I moved the little wire end table back into my bedroom and replaced it with these two suitcases which work just as well and also double as overflow kitchen storage.
Simple stuff but each little adjustment makes me like the room more, or even just makes it feel fresh and changed for a bit. Especially great when it's all stuff I already have on hand.
Friday, October 2, 2015

Thursday, October 1, 2015
September muni people
I can see the change of the season in last months muni people, from shorts to sweaters it was pretty clear, it's fall now. Also I'm three quarters of the way through this project, still trying to decide what to do with them all when I finish.


Monday, September 28, 2015
Kitchen reveal!
The journey to finish or at least 'finish' the kitchen in my apartment has been a long one. It is easily the space with the most limitations, and the most funky, old building I will call them quirks, though there are probably less cute sounding words I could use. So I've had trouble coming up with a plan for the room, despite knowing it needed to be fixed up since the first moment I moved in. This is how it looked when I showed up.

My roommate is definitely a have-things-out-where-you-can-see-them sort of person while I'm a put-it-away-where-the-clutter-can-be-out-of-sight kind of gal, so there's a certain amount of clashing there. But I think even he agreed that this first pass I did where I just moved the microwave and toaster oven and cleaned up the counters a bit, was already much better and brighter feeling. But after living with that for another year, well it just seemed like I could still do better, despite the limitations. So when I got the all clear to paint the floors it seemed like the time to really make everything else work.

And now it looks like this! To me this really speaks to the powers of paint. The cabinets are still old and wonky and all of the old building quirks are there. But it is so much cleaner and brighter, and the fun of the pattern really makes the space seem much more special to me.

Even the almost-black accent wall works since everything else is so white or light. On it's own it's a dramatic backdrop for colorful dishes and glasses, and with the rest of the room, it sort of provides a nice pause, and makes the prep table and fridge feel like a separate space.

Again, here is a before, and also a during image. The yellow was fine, but especially when paired with the dingy yellowed floors, gave the room a sort of sallow feeling I just couldn't shake.


I also did a bit of cart switching, putting the wooden kitchen cart in the living room where it fits perfectly as a bar cart, and wheeling my little industrial cart in next to the door where it's much narrower sized doesn't block the cabinet door from swinging open. I think eventually I would like to replace this with some tall industrial shelves for dishes and such, but for now, this is something that I already have, and it ties into the stainless work table so it seems to fit better. Now I want to hang out here all the time. It feels like an easy space, but not a cookie cutter kitchen at all.

All of the various projects in this room have been cataloged in great detail here already so if you want to see more there's the floors how to here, the accent wall here, painting the cabinets here, and the interiors here, and the pattern on the glass fronts here, oh and the refrigerator door handle (small change big impact) here. And I will just wrap up with a few more photos since I took too many because I'm so happy with how it looked. Also please excuse the accidental ankle selfie in the one below!


Friday, September 25, 2015

Monday, September 21, 2015
Painting an old kitchen floor..... and pattern!
If I were asked to name one thing in my apartment that I liked the least and would change if I could, I would say the kitchen floor. It is hard to convey in photographs just how terrible it is because it is partially a feel thing, it's just so old it's perpetually sticky, and it's also become discolored and, well, plain icky feeling. It might have been nice once but now it's an endless frustration of constant cleaning and yet never feeling or looking clean. The landlord wasn't interested in replacing it, and in fact, my roommate tells me years ago when it was peeling at the edges she installed a little additional trim at the baseboard to cover it up rather than putting in new linoleum, so I've been living with it and loathing it for two years. Until now.
After talking some about paying to replace it ourselves and doing research into cost, I ran the idea of painting the floor by my roommate, and though tentative, he was interested. He shares my disappointment in the floor and has been living with it for longer, so he gave me the all clear with the only request being that it be gray paint. And so we scheduled a weekend where we could both deal with having minimum to no access to the kitchen and I started to gather supplies.
In all my research into painting old floors, especially old linoleum tile or tile look floors like mine, everyone had used floor and porch paint (designed for being outdoor and being walked on) and some had used a sealant of some kind but most just let the paint stand up to wear and tear itself.
Luckily my local hardware store had floor paint, and was able to mix it in any color I wanted, so I picked a lighter gray on the paint chip with deep space, the dark dark gray on the kitchen wall, figuring I should keep my grays in the same family. I also got an extender pole for the paint roller and a new short handled angled brush (mine has finally started looking funky after two years of painting all the rooms so I decided it was time) and pulled together inspiration online.
I have always wanted a checkerboard floor but was struggling with it being gray and black or gray and white instead of black and white. That just didn't seem right but as gray was Charlie's only request and he goes along with my whims so much without complaint or comment I figured it needed to be kept as the base.
It was actually my papa who made the lightbulb inducing suggestion. He said what about a pattern with a stencil. And then I looked back through my pinterest and realized of course, I've been pinning images of patterned floors for years. I love to look of elaborate tiles but just figured they were always a dream as they are pricy and also, you know, I'm in a rental, but what a great opportunity for experimenting. Besides if it didn't work out I could just paint over and keep the floor solid gray.
So I played around a bit with designs and did some tests on the old floor with spray paint, and I looked forward to the first scheduled day of floor painting with excitement and trepidation.
I started by moving everything but the fridge and stove out of the room and cleaning the floor twice. Then I painted around the edge. With the first few strokes of paint I knew that this was going to work out okay because the coverage was amazing, and the edges and corners already look a million times cleaner and nicer. The freshly painted white cabinets looked better next to the gray floor as well.
The next step was the most fun. I got to pour a bucket of paint onto my floor. The first coat was definitely the most impactful as I could see the grimy funky floor disappearing under clean fresh paint, and also using the long roller is very fun. The whole thing including edging took about twenty minutes.
And then I settled in to wait four hours before going in for coat number two. Honestly one coat could have been fine but I wanted to make sure all the awfulness was well and truly covered so I figured two coats to be safe. It looked amazing and I was finished just before midnight. In the morning I found myself walking by over and over just to peek and see how transformed the room looked.
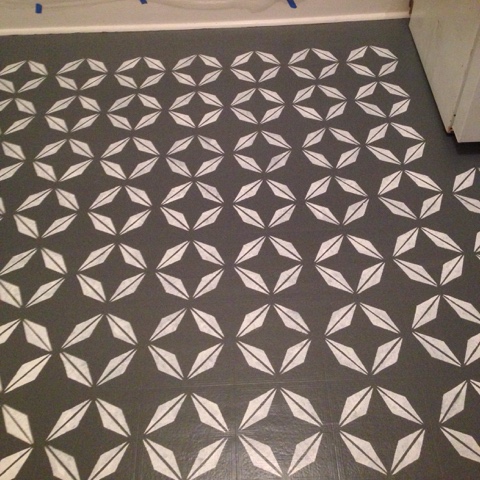
I left it to keep drying all day while I was at work and when I got home that night it was time for the stencil. I was very scared about this part because it seemed to have the most chance of failing and or just looking sloppy or amateur or like a bad craft-plosion. So I was sceptical of the outcome and very much leaning towards just keeping it gray. I actually changed the stencil pattern at the last minute as well. And then ruined the first one when it turned out that spray paint started getting really messy after four tiles (the amount I'd done as a tester up at the top) and I had to re-cut the stencil again and then paint over the spray paint portion and try doing the stencil old school with a brush.
When I got through these three and paused to consider and do some math as to how long this might take me. I was also concerned that the brush created a more textured pattern, and you could see minor flaws in each and I started to hyperventilate a bit. But then I took a deep breath and stood up to look at them and reminded myself that no one was going to be crouching on my floor examining my handywork as up close as I was when I was working. And it was true that from standing height it looked much better. I was still not convinced about the final product but decided to continue.
After a few more hours and some snack and stretching breaks, it was looking more like it might work. I was following the 'tile' pattern of the underlying linoleum which is unfortunately not centered in the room, or starting with a whole unbroken tile on either side so there was some odd sized uneven ones all around the perimeter but the first night I was focused on filling in the bulk of the space. Since the stencil was on the floor instead of the wall I found that two tiny pieces of blue tape was all I needed to hold it in place and it was easy to lift it cleanly away after with minimal mess. I did keep a little jar of the floor paint with me and a tiny brush to touch up the most grievous of smudges but found I needed to do that less and less as I went.
It was very late when I finished and my back was sore but I went to bed with the floor looking like this, feeling pretty good about my project.
The next morning I decided to augment my plan yet again, as I liked the boarder of solid gray around the edge, but I wanted it to be even and much smaller, so I put down a line of blue tape, and painted up over it for the remaining area. I had to cut down my stencil as I went, starting with the biggest tiles and slowly removing more and more as I went, like a suicide print, until I was left with a little three inch strip at the very end which looked much the worse for wear.
This is what I spent the morning doing. Not the most comfortable or flattering position but I made good progress and the stenciling was all done before lunchtime.

I was over the moon excited by how this looked and couldn't wait to move the furniture back in and see it all finished. But I had just spent more than twelve hours on my hands and knees painting the floor and I knew that I would be heartbroken if it got chipped or scuffed after all that hard work, so I went back to the hardware store to see what sort of options there were to seal and protect my work. I was directed to an oil based poly which smelled awful and brushed on disturbingly yellow but dried clear. I did two coats that day and left it to dry for 24 hours after the second coat before walking on it (very difficult as at this point we had both gone four days without cooking and were antsy to get back in there) but the following day at eight pm I walked in carefully with socks and tested it out and it seemed to be holding up well, not at all tacky to the touch and wonderfully mirror-bright shiny. With the solid gray paint and the clear coat the texture of the 'tiles' which previously were magnets for dirt and grime, now looked clean and added interest to the pattern, making it look even more like it was tiles as opposed to paint.
I have lived with the painted floor now for over a month and it has held up outstanding. There is a tiny dent where my roommate dropped a frying pan on the first night but it's easy to fix and no one has noticed it but me. It wasn't the easiest project, mostly because it was physically uncomfortable work and time consuming and a bit tedious, but it was also fun, and totally 110% worth it for the outcome. I figure this can easily make it a few years with our normal heavy use and if it needs to be redone then I see that as just an opportunity to try out a new different color and pattern combination. But for now, I am the proud new owner of a custom patterned kitchen floor, and an entirely redone (budget and rental style) kitchen. And I have never been more excited to cook in my life. Or even to sweep the floor!
Subscribe to:
Posts (Atom)