Thursday, August 27, 2015

August circus party

This months party went together very quickly, if a bit down to the wire time wise. I went with a circus theme because I have this set of beautiful circus printed tin plates I wanted to use and the rest of it just fell into place naturally. 

I set the table with a red eyelet tablecloth and the aforementioned tin plates. Polka dot glasses with striped straws for beverages, and simple white napkins with gold flatware finished it off. With the cake on a pedestal in the middle I just added a collection of rubber animals down the middle of the table to finish things off. Simple but with a fair amount of color and interest. 


On the wall I used red washi tape to put up a blown up photo of my mother feeding elephants in the circus, and I used a roll of bright blue tickets as streamers hanging across the table. Again, very simple but still makes an impact. I made up a simple ticket image for place cards and printed it on blue paper to tie the streamers color into the table setting.

For the cake I painted stripes on some white card stock and made the circus tent, then added some tiny animals around the perimeter.

Budget

Tickets.........................................................................4.00
Blueprint copy.............................................................4.00
washi tape....................................................................3.00
total............................................................................11.00


Monday, August 24, 2015

Kitchen progress

The kitchen is the room in my apartment that I would most like to change. However, as a renter, I am fairly limited to what I can do. Of course, I feel very blessed to have full reign to paint and change so much of my apartment, but in reality, this is a kitchen that has been treated very poorly for years, and therefore, the best solution would probably be to rip it out and start from scratch. With that off the table though, I did have to try out whatever else was available to me.


As you can see from these pictures, the kitchen has been painted many many times in it's long history, and not painted well, or correctly. The doors of the cabinets should have been removed and sanded before they were repainted each time, but instead the culprit just painted over everything, and now it's all so thick it's impossible to remove any of the hardware without some sort of power tools. And as there's a super high chance some or all of these layers of paint have lead in them, sanding wasn't really even an option, too toxic. So I decided that if the doors wouldn't close all the way, and the finish was going to be uneven, and the hardware wasn't exactly lined up, I could at least put a fresh coat of paint over it all so that it would be clean and true white as opposed to the above pictured layered mess, and I would be (hopefully) safe from flakes of paint drifting down into my granola in the morning. I got a can of Benjamin Moore in Chantilly Lace (the same white I used for all the trim in the house, including the kitchen) and covered everything in two coats. Luckily the coverage is excellent and I was technically painting over another white of sorts, or at least all the colors were light, so I was able to achieve a good even bright white.

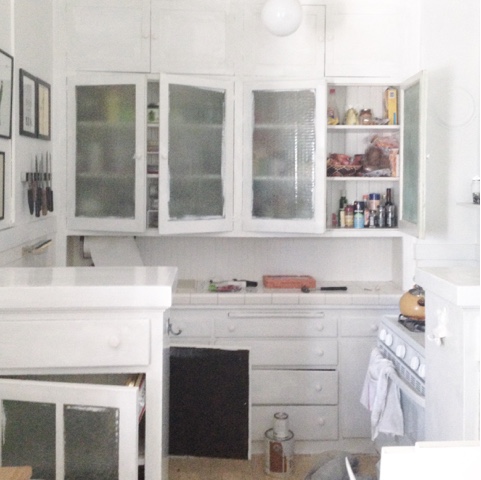
It might look a bit chaotic here but it's already a significant improvement. Of course the weird tile counter tops are now more beige than the cabinets but I can't win them all. Next, I am working on a solution for the cabinet fronts, to hide the jumbled mess in the cabinets, as well as the accent wall and of course, most important and impactful of them all...... the floors!


Thursday, August 20, 2015

the quickest fixes are sometimes the best

I am in the midst of a slightly impromptu kitchen renovation (at least as much as a very old and quirky rental apartment can be renovated) and despite having done a bunch of work, do not quite have a photos of finished projects yet. Everything should be coming together with the last big project this weekend so hopefully soon. But in the meantime I thought I'd share this one small redo that sort of started this whole process.
Really the kitchen redo began because I was cleaning and just not feeling like things were actually getting cleaned. My kitchen doesn't have any sort of range hood or fan and there's one window at the far side of the room so even if that's open, it's not the best ventilation. Therefore the regular cooking smoke and such has slowly been coloring every surface over the years. I scrubbed down every surface, all the appliances, and have been applying a fresh coat of paint to all the walls and cabinets, but while I was cleaning the white fridge, I hit a wall with the refrigerator door handles. While the doors and sides cleaned up very well, the handles were just....not. And they stood out in even greater contrast to the cleaned surfaces of the rest of the fridge. So while I was staring them down I noticed.... screws! These were removable!

So I took them both off, set them up on my roof and applied a good half dozen thin coats of white spray paint. I let them dry overnight and then put them back on the doors. This small change has made such a big impact on how I feel about my kitchen. The fridge looks clean and fresh and every time I go to open the door to get something out I smile with relief at how nice and clean the handles are. For a free fix (I always have white spray paint) I just can't believe I didn't think of this sooner.

Monday, August 17, 2015

new couch

I'm still moving stuff around and sorting it all out, but I am finally down to just one couch as the big old nubbly beige-tastic slip covered monster is gone! (I feel like I should be humming the ding-dong the witch is dead song from The Wizard of Oz) After two years of loathing a piece of furniture I am free. And thanks to my parents swooping in to Ikea and grabbing the last white slipcover the Emeryville location had in stock, I have a fresh new couch!. It's not my dream couch, but it's a much more appropriate size for the space and it's clean and it's up off the floor and I have actually been enjoying hanging out in this room so much more now. 
Somehow I came up with the idea to keep the footstool from the old couch and just remove the slipcover to use with the new couch. While the legs don't currently match it makes the left side of the couch into a nice cozy chaise when covered with a sheepskin. Also all of my more quirky pillows have a great background on the white couch. I will be replacing the legs with something less blocky as soon as possible and there's always the possibility of rearranging and shifting things around, but for now, I am monumentally happy with this change. The whole space is lighter and airier and so much more welcoming. And seeing as this is the first space I see when I come out of my room in the morning, and the first thing guests see as the enter the apartment, I consider that pretty important. 

(I don't know why but I loved this out of focus photo of the room and felt the need to include it.)

Wednesday, August 12, 2015

beehive cake topper

Just wanted to pop in real quick to talk about making that cake topper for the tea party. This should wrap up the last of the July party posts so that I can move on to other thinks, like this months party!
The structure of the hive was pretty simple, I just folded and taped some construction paper into a roughly hive-like shape and then covered it in yellow crepe paper. But that didn't seem cute and bee-ish enough so of course I had to make some bees.
Since it seemed best for them to be vaguely in scale to the mini hive I pulled out these little yellow pom poms I've had stashed from some old project. I skewered each one on a straight pin, drew on some stripes and glued in some tiny paper wings and voila! It's a bumble bee!
You can see the scale represented pretty well her next to that big sharpie marker.
Since they were already on pins I was able to just stick them into the hive wherever I wanted and I also added a little buzzbuzzbuzz banner on a longer straight pin as well. Simple and cute.

Monday, August 10, 2015

Paper flowers

The paper flowers for last months part turned out to be very simple. I wanted something sturdy so I used construction paper. Then I started with a small middle 'flower' and kept cutting bigger and bigger ones until I thought it would be full enough. I rolled the tips or sides of the petals down so that they would be more curved, cut a small fringed yellow piece for the center and green paper leaves, and then stacked it all and glued it together.

When that seemed to work out, I used it as a template and cut out a bunch more so that they would be more or less uniform and assembled them all factory style.

It seems like this super simple technique would be easily modifiable to make different 'types' of flowers, change the shape of the petals, play around with the leaves and such, but overall it was was easy and satisfying. As you can see I made them about the size of a tea saucer but they could easily be made bigger and more layered, or very tiny as well.

Wednesday, August 5, 2015

Bee piñata

The bumble bee was a big part of the decoration for July's party, and was relatively easy to construct.
I made a base out of crumpled up packing paper (I'd just gotten a box of shoes so that was convenient) and then wrapped it in strips of yellow tissue paper to form a base. Then I cut up a bunch of white, yellow and black fringe.

I started with a small circle of white fringe at the bottom, or butt of the bee, and worked in circles gluing on fringe as I went, switching to yellow after a few rows.


When the entire body was covered in fringe, I made legs and antenna out of black pipe cleaners, doubled up and twisted together. I tried to make little feet at the bottom of them but figured I could bend them into more leg like positions once the bee was all put together. I punched holes in the bee with an awl and threaded the legs in with a dab of hot clue so they would stick. Same for the antenna.

And then I cut some vaguely wing shaped pieces out of drafting tracing paper and and sewed the layers together, then glued them up under the stripe of black fringe. I tried out some kind of 'eyes' but thought they just looked too cartoon-esc so I scrapped that idea. I used a big upholstery needle to go through the body sideways with fishing line so that I could hang him from an angle. I did some fluffing of the fringe and straightening of the legs once it was on the wall, I think this took about two hours to construct. 
It is not a real pinata, in the sense that it isn't hollow and full of candy, but as a three dimensional decorative object I think it adds a nice oomf to the honeycomb wall. And now of course it's languishing on top of my bookshelf until I come up with another venue for it.